Protect Your Public Website with Cloudflare Tunnels, CrowdSec, and NGINX

Hosting a public website can be stressful - it's constantly being scanned for vulnerabilities. Today, I'll share how I used Cloudflare Tunnels, CrowdSec, and NGINX to block as many threats as possible so I can sleep peacefully at night.
Introduction
When I first built my cluster, I took the simplest approach to exposing my website. I bought a domain, forwarded port 443 on my router, and created a DNS entry. Finally, I set up cert-manager, and my website was live. Yay!
Even though I knew that any public IP address or website would be scanned for vulnerabilities, seeing my ingress logs made me uneasy.

A screen full of log entries, all arriving within a second. None of these requests were legitimate. It became clear that my cluster was constantly being probed for weaknesses.
I didn't want to deal with hundreds of automated scans every day, so I decided to take action:
- Stop exposing ports on my public IP address.
- Block requests that scan for known vulnerabilities.
Act 1 - Cloudflare Tunnels
To address the first point, I decided to use Cloudflare Tunnels.
First, we need to delete DNS entries pointing to our public IP. Then, we can set a Public Hostname in the Cloudflare dashboard (which will recreate the DNS entry). I used the following settings:
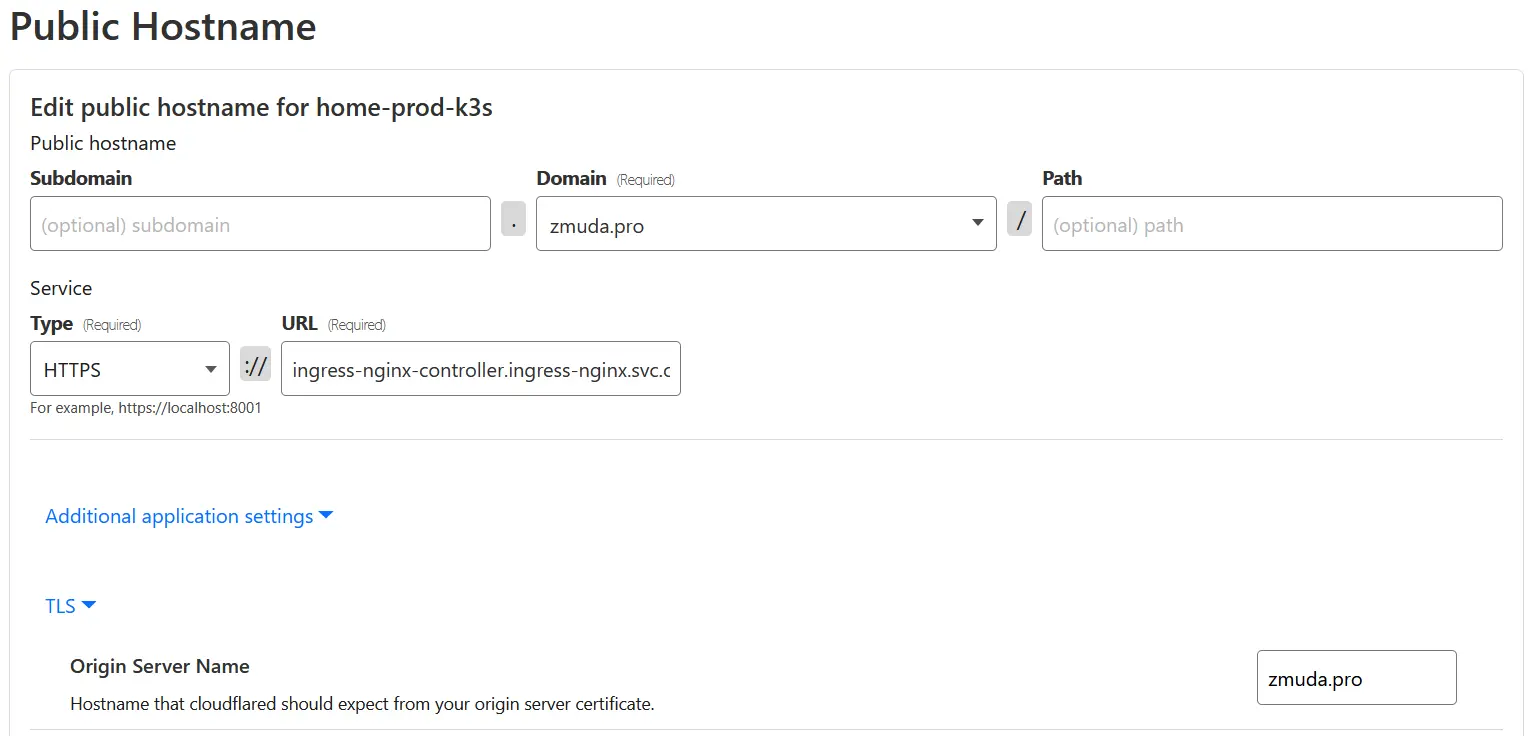
- Subdomain: Left empty
- Domain:
zmuda.pro - Path: Left empty
- Type:
HTTPS - URL:
ingress-nginx-controller.ingress-nginx.svc.cluster.local:443(internal ingress-controller service address) - Additional application settings:
- TLS → Origin Server Name:
zmuda.pro - TLS → HTTP2 Connection: Enabled
- TLS → Origin Server Name:
The Origin Server Name is crucial - it tells Cloudflare what subject name to expect on the served certificate.
If you don't have cert-manager set up, you can change the Type to HTTP instead and update the URL to use port 80.
With Cloudflare configured, it's time to install the client.
Installing Cloudflared
I found an example configuration here.
I created my own ConfigMap, mirroring the public hostname settings from the previous step:
apiVersion: v1
kind: ConfigMap
metadata:
  name: cloudflared
  namespace: cloudflared
data:
  config.yaml: |
    tunnel: 01234567-89ab-cdef-0123-456789abcdef
    credentials-file: /etc/cloudflared/creds/credentials.json
    metrics: 0.0.0.0:2000
    no-autoupdate: true
    ingress:
      - hostname: zmuda.pro
        originServerName: zmuda.pro
        service: https://ingress-nginx-controller.ingress-nginx.svc.cluster.local:443
        http2Origin: true
      - service: http_status:404
To create the secret, use this command with your own token from the Cloudflare dashboard:
kubectl create secret generic tunnel-credentials --from-literal credentials.json=eyJBY...
Your website should now be accessible via Cloudflare Tunnels! You can now safely close the exposed ports on your router.
Note: I tried setting the same configuration using the CLI, but for some reason, the Origin Server Name only worked when entered via the dashboard.
Updating NGINX Configuration
Since Cloudflare acts as a proxy, ingress-nginx logs will only show the IPs of Cloudflared pods. To preserve real visitor IPs, update your ingress-nginx Helm values:
# values.yaml
controller:
  config:
    enable-real-ip: "true"
    forwarded-for-header: "CF-Connecting-IP"
    proxy-real-ip-cidr: "10.0.0.0/8,173.245.48.0/20,103.21.244.0/22,103.22.200.0/22,103.31.4.0/22,141.101.64.0/18,108.162.192.0/18,190.93.240.0/20,188.114.96.0/20,197.234.240.0/22,198.41.128.0/17,162.158.0.0/15,104.16.0.0/13,104.24.0.0/14,172.64.0.0/13,131.0.72.0/22"
    use-forwarded-headers: "true"
# The rest of the config
enable-real-ip: Enables real user IP logging.forwarded-for-header: Cloudflare sends the real user IP in theCF-Connecting-IPheader.proxy-real-ip-cidr: Includes Cloudflare's official IP list and private10.0.0.0/8addresses.use-forwarded-headers: EnablesX-Forwarded-*headers, which we'll need for CrowdSec later.
Act 2 - CrowdSec
⚠️ Warning: Ingress NGINX version 1.12 or higher is not currently supported by CrowdSec due to the removal of Lua plugin support. See this issue for updates. I'm using the ingress-nginx Helm chart version
4.11.xfor this reason.
While Cloudflare protects against DDoS attacks, what about vulnerability scanners flooding our logs? CrowdSec helps automatically ban known malicious IPs. We will also enable AppSec component, which acts as Web Application Firewall (WAF).
Installing CrowdSec
I followed CrowdSec's documentation to install it.
To make CrowdSec recognize X-Forwarded-For headers, update its configuration:
# values.yaml
container_runtime: containerd
config:
  config.yaml.local: |
    api:
      server:
        use_forwarded_for_headers: true # This is the important line
        auto_registration:
          enabled: true
          token: "${REGISTRATION_TOKEN}"
          allowed_ranges:
            - "10.0.0.0/8"
agent:
  acquisition:
    - namespace: ingress-nginx
      podName: ingress-nginx-*
      program: nginx-ingress-controller
  env:
    - name: COLLECTIONS
      value: "crowdsecurity/nginx"
lapi:
  env:
    - name: ENROLL_INSTANCE_NAME
      value: 'homelab-prod'
    - name: ENROLL_TAGS
      value: 'k8s k3s nginx'
    - name: BOUNCER_KEY_nginx
      value: 'your-key' # generated with `cscli bouncers add -n <bouncer_name>, use the same key in ingress-nginx values in API_KEY
appsec:
  enabled: true
  replicas: 1
  acquisitions:
    - source: appsec
      listen_addr: "0.0.0.0:7422"
      path: /
      appsec_config: crowdsecurity/appsec-default
      labels:
        type: appsec
  env:
    - name: COLLECTIONS
      value: "crowdsecurity/appsec-virtual-patching crowdsecurity/appsec-generic-rules"
In this example, I put secrets directly in environment variables for simplicity. However, it is recommended to use Kubernetes secrets for managing sensitive data securely.
Updating Ingress-NGINX for CrowdSec
To enable CrowdSec's bouncer plugin in ingress-nginx, follow the official guide.
To simplify maintenance, I created a separate crowdsec-values.yaml file and passed it along with the standard values.yaml for ingress-nginx.
After deploying everything, you can check your CrowdSec alerts.
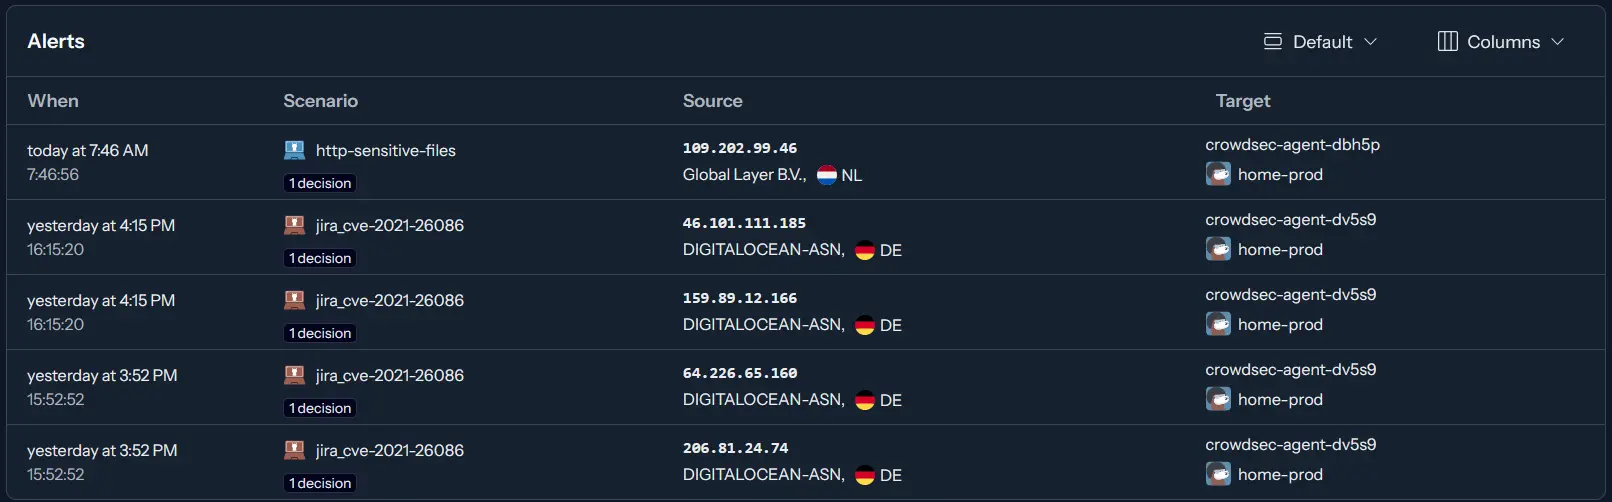
It looks like it's working!
Summary
With this setup, I feel confident that my cluster is secure. A DDoS attack would need to take down Cloudflare first, and CrowdSec ensures that known malicious actors are blocked automatically.
Now I can sleep peacefully, knowing my website is well-protected. 😴